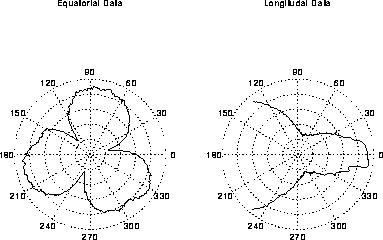
Figure 16: Averages of radial CMM measurements on a nearly perfect sphere (exaggerated scale).
Marjorie McClain and Christoph Witzgall ACMD
Keith Eberhardt and Mark Levenson, Statistical Engineering Division
Bruce Borchardt, W. Tyler Estler,
Theodore Hopp, and Steven Phillips, Manufacturing Engineering Laboratory
Yin-Lin Shen and Fred Zhang, George Washington University
There are more than 20,000 coordinate measuring machines (CMMs) in U.S. Industry today, and their use is rapidly growing. A CMM is basically a robotic machine that measures the dimension of a part using a three-dimensional coordinate system. Its efficiency at this task explains its growing popularity. Currently, there is no rigorous methodology to derive the accuracy and precision of a measurement from a CMM. Developing such calibration methodology would promote improvements in quality and productivity through better determination of part dimensions.
As part of a NIST competency project, CAML scientists are playing an active role in a inter-laboratory group that is making significant progress on the problem. In our second year of the project, the group has concentrated on understanding and modeling the CMM probe, which is believed to be the largest source of error in the measuring process. The probe is the component of the CMM that senses the contact with the part being measured. The most common class of probes consists of a spring-tensioned tripod of electrical contacts. This construction leads to a very pronounced systematic error in the CMM measurements.
In the past year, the group has conducted a large data collection and modeling effort. A small sample of this effort is shown in Figure 16.

Figure 16: Averages of radial CMM measurements
on a nearly perfect sphere (exaggerated scale).
The figure displays (in an exaggerated scale) averages of radial CMM measurements made on a nearly perfect sphere. If the CMM was perfect, the figures would be circles. The equatorial data reveals a trilobed pattern that is predicted based on the tripod construction of the probe. Physical principles also account for the pattern in the longitudinal data. Based on models developed in this effort, it is now possible not only to characterize the error derived from the probe, but also to correct for it and improve the overall measurement process.